

Tomorrow is my daughter Ellie's 30th Birthday. Every year she has a Buche de Noel for her birthday cake and tonight I made it for the party tomorrow night. This is a recipe I found many many years ago in an old Southern Living magazine and I have modified a bit. As you can see from my recipe, this is a much loved Christmas/birthday tradition. This is a great, easy recipe and presentation to wow your friends and make it look like you went to tons of trouble. Not that she's not worth tons of trouble, but really this is one of the easiest and prettiest cakes I make. So enjoy, and let me know if you try it!!!!
First we are going to grease and flour a jelly roll pan (heavy cookie sheet with sides).


Here are the ingredients that you will need to make the cake part of the Buche de Noel.

What you have here is, 4 eggs, 1/2 teaspoon of salt, 3/4 cup of granulated sugar, 1 teaspoon of vanilla, and 3/4 cup of pancake mix (I use Bisquick).
You will use a blender and first put all four eggs and the 1/2 teaspoon of salt in the blender and cover and blend until frothy, usually a minute or two. It should have bubbles and froth when done.


Next add the granulated sugar and the vanilla, cover and blend about 30 to 60 seconds or until smooth.


Now add the pancake mix (I use Bisquick) and cover and blend for another few seconds until it's mixed in and blended. Then spread the batter on the pan, tilt the pan around until the batter is completely covering the bottom (the jelly roll pan should measure 15 x 10 x 1 inch).


 Then pop it into a 400 degree oven for 9 minutes (8-10 minutes, I do 9 and it always comes out fine.)

While the cake is baking it is time to prepare the area for rolling the hot cake when it comes fresh out of the oven. Lay clean paper towels down on the counter (big enough to hold the finished rectangle cake), and completely cover the paper towel with powdered sugar.


 Now it's time to make the icing for the Buche de Noel. Since my daughter prefers vanilla icing to chocolate I'm using that for her birthday, but usually I use instant chocolate pudding, you will need two of the large boxes of either instant chocolate pudding,( or instant vanilla pudding), two boxes of dream whip (4 packets, there are 2 per box), 2 tablespoons of instant coffee and 3 cups of milk.


By now the timer is probably going off and it's time to remove the cake from the oven and loosen it from the pan (while it is still hot). You really have to loosen the sides with a spatula, get under it and make sure it is loosened completely from the pan, then you will flip it over onto the prepared, powdered sugared paper towel.


roll (the long side) all the way up into the paper towel.


While the cake is cooling, I finish up the icing using a mixer I beat the icing until it is nice and thick, like thick pudding. I like to put a paper towel around the front of the mixer, like a splatter shield, until the pudding thickens. I also use this cooling time to clean up the work space a bit.


 The fun begins now as it's time to ice the Buche de Noel, almost done. Simply, unroll the cooled cake and slather it with about 1/3 to 1/2 of the icing you have made. Be generous. Completely cover the cake.


Now roll the completely iced cake up all the way. The powder sugared paper towel can now be thrown away.


 Now get a pretty dish, I use one with low sides, and using a serrated knife, make a diagonal cut 1/4 of the way down the roll. Place the long piece of cake on the plate first and then place the diagonal cut against the long roll.


 Now it is time to completely ice the Buche de Noel. Slather the entire cake with the remaining icing, cover every part of the Yule log. Extend the icing over the front of the log, but don't cover the ends. Don't worry, we are not quite done yet.


 Use a fork to make the "wood grain" marks in the Buche de Noel. Swirl the fork through the icing, making knot holes and wood grain lines. Do the top and all sides. Use a paper towel to clean up the excess icing that might have gotten on the top of the plate.


 Finally, use powdered sugar around the sides of the Buche de Noel to make "snow" and garnish with some beautiful silk holly or tiny poinsettias. and voila, a lovely Buche de Noel to share with your friends. Often people decorate the top of the log with cherries which I have done and is very pretty too. If you use the chocolate pudding instead of the vanilla the Buche de Noel will be a nice dark brown chocolate color. Refrigerate once made, before and after serving. Enjoy!
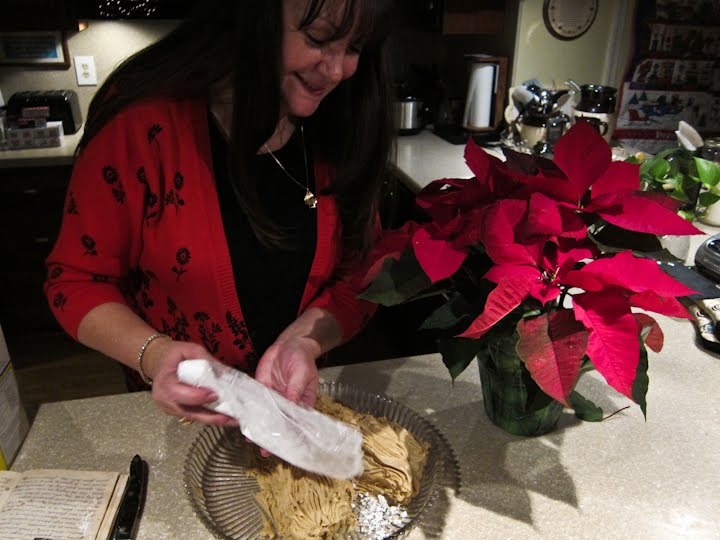


Thanks Mom, Love you!
ReplyDeleteOh yes! Looks very easy and OH SO YUMMY!
ReplyDeleteYou are so welcome Ellie! Can't wait to celebrate with you tomorrow. Try it Jenn, you'll love it!
ReplyDeleteBy the way, many thanks to my daughter Jean for photographing the making of the Buche de Noel. Love you honey.
ReplyDeleteThat was really cool! Thanks Bobbie and Jean! So much for a healthy breakfast... I am now craving Buche de Noel!!!! :-) Happy birthday to Ellie ... oh your daughters were the cutest babies!!!! And certainly turned into lovely, Spiritual ladies!!!! :-)
ReplyDeleteHugs to you -
Leslie
You are so A-MA-ZING!! This looks like a snipet from "At Home w/Bobbie K" (Yes, you should have your own show!) The pictures and the step-by-step process look so professional - and so doable! Chloe and I are going to make this together tomorrow for our Mother/Daughter time project. I can't wait! Thanks, Bobbie, for mentoring via internet! (smile) You're the best.
ReplyDeleteHugs,
Kimberlee
Yay, Kimberlee, post a pic on FB so that I can see it. You'll love making it and it's so pretty. Get some pretty silk holly to decorate with.
ReplyDeleteThank you! I was planning on making this today to serve later this evening after Church and couldn't find my recipe. This is exactly what I have done in the past. Thanks! Merry Christmas!
ReplyDelete